A knot is part of your tackle
A good knot does not need to be mysterious. It needs clean wraps, a properly tightened shape, and a quick check before it meets the water. Learning three connections gives you options without turning your tackle box into a knot museum.
Use short practice pieces of line and work slowly. If you are practicing with a hook, keep the point protected or use a swivel while you learn. Fishing is a patient sport, and knots reward the same attitude.
Before you tie
Run your fingers along the last section of line. If it feels rough, cloudy, flattened, or nicked, cut it back before tying. A perfect knot cannot repair damaged line.
Leave enough tag end to work comfortably. Wet many nylon or fluorocarbon knots before the final snug-down so the line slides and the wraps seat without unnecessary heat. Pull the knot tight with steady pressure, not a sudden jerk. Keep hooks and lure points pointed away from your hands, clothing, and anyone beside you.
1. Improved Clinch Knot
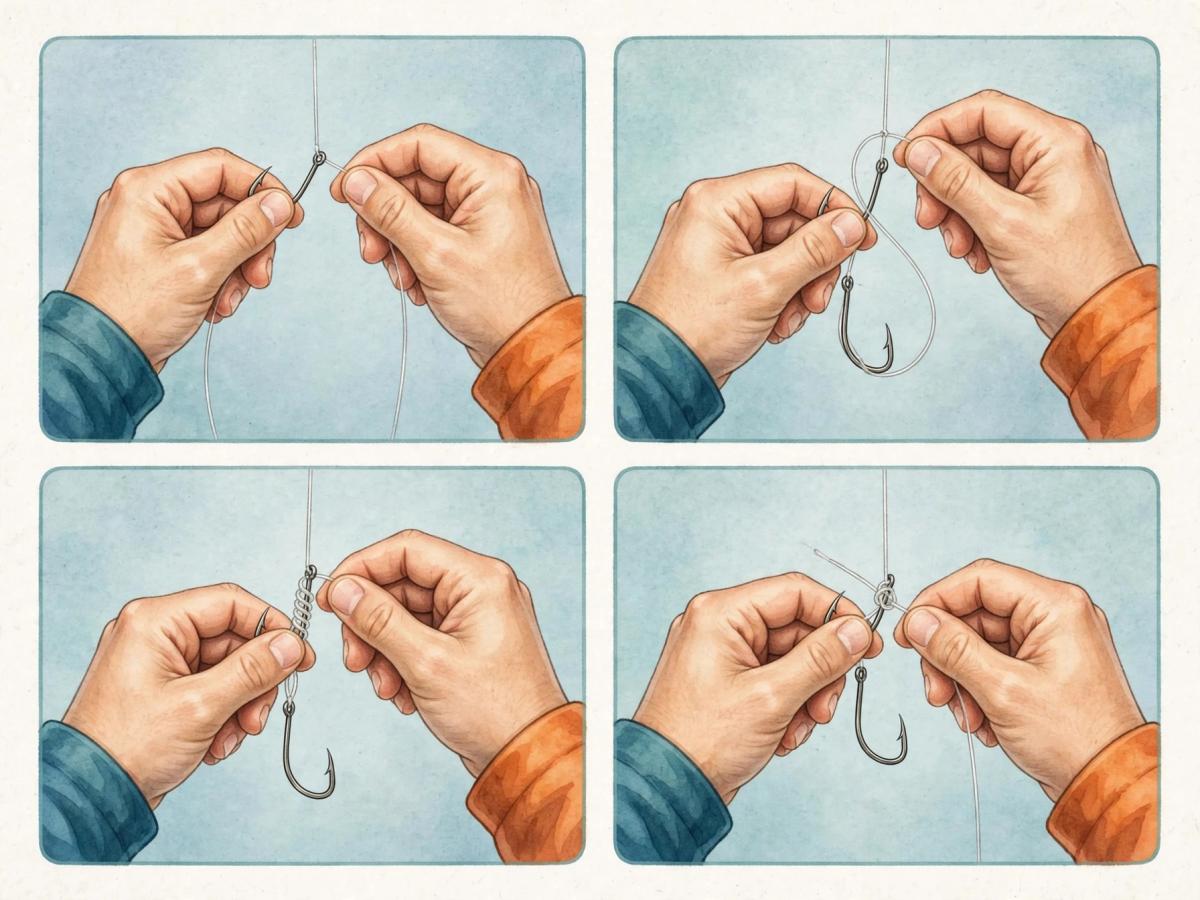
The Improved Clinch Knot is a practical line-to-hook connection for many monofilament and fluorocarbon setups. It is a useful first knot because the finished wraps are easy to inspect.
- Pass the line through the hook eye and pull several inches through.
- Hold the hook and the standing line, then wrap the tag end around the standing line about five to seven times. Keep the wraps neat rather than stacked in a messy bundle.
- Pass the tag end through the small opening beside the hook eye.
- Guide the tag end through the larger loop you created when making that turn.
- Wet the line. Pull the standing line while guiding the coils toward the eye. Snug the knot without crushing the line.
- Pull firmly by hand with the hook held safely, inspect the coils, and trim the tag end close enough to be tidy while leaving a small bit for security.
If the coils cross, slide into a lump, or refuse to seat, cut it off and start again. A fresh knot is faster than wondering about a poor one.
2. Palomar Knot
The Palomar Knot is a simple connection option when you can pass a doubled section of line through the eye. It leaves a strong, tidy connection when tied carefully, though a doubled line may not fit through every small eye.
- Double roughly six inches of line and pass the loop through the hook or swivel eye. If the eye is tiny, choose another connection rather than forcing the line.
- Tie a loose overhand knot with the doubled line. Keep the hook or swivel hanging below the knot.
- Pass the hook or swivel completely through the large loop.
- Wet the line, then pull the standing line and the tag side so the knot slides down and seats against the eye.
- Check that the doubled strands are lying together and trim the extra end.
The important habit is the inspection. If the strands cross awkwardly or the loop catches on the wrong part of the hook, redo it.
3. Surgeon’s Loop
A Surgeon’s Loop creates a fixed loop at the end of a doubled line. That loop can be useful for a simple loop-to-loop connection with a leader or a pre-tied section. Keep the loop modest in size so it does not become an extra piece of tackle to manage.
- Double the end of the line to form a short section of parallel strands.
- Tie an overhand knot with the doubled line, but leave it loose.
- Pass the doubled loop through the overhand opening one more time. This extra pass is what gives the connection its name and shape.
- Wet the line and pull the loop and standing strands evenly until the knot is snug.
- Trim the tag end and check that both strands exit the knot cleanly.
For a loop-to-loop connection, pass one loop through the other, then pass the attached leader or line through the first loop before pulling the connection closed. Keep the joined loops compact and inspect them before casting.
When to retie
Retie after the line rubs against rocks, wood, docks, or weeds. Retie if you snag hard, see a nick, notice loose wraps, or feel the knot slip during a firm hand check. A fish does not have to be large to expose a connection you already know is questionable.
Retie when changing from a heavier lure or sinker to a lighter setup if the old knot has been worked repeatedly. After landing a fish, look at the section closest to the hook. If it is rough or curled, remove the worn part and tie again.
Try this at home
Cut three short pieces of inexpensive line. Start with a swivel or a large ring so you can see what your fingers are doing. Tie each knot twice. After every tie, ask four questions:
- Are the wraps neat?
- Did I wet the line before snugging it?
- Does the knot sit against the eye or loop the way I intended?
- Did I test it while keeping the point or connector away from my skin?
You are not trying to win a speed contest. You are building the calm habit of tying, checking, and retying when the evidence says to.
Safety and local rules
Check the rules for the water you plan to fish, including any restrictions on hooks, bait, species, and tackle. Keep hook points protected while practicing and walking. Use pliers when handling a hook near a fish or when a connection has become difficult to reach. If a knot or hook is damaged, replace it rather than trusting a hopeful tug.
Quick recap
The Improved Clinch Knot is a useful line-to-eye connection, the Palomar Knot is a doubled-line connection option, and the Surgeon’s Loop creates a simple end loop. Tie slowly, wet and snug the line, test safely, and retie whenever the line or knot gives you a reason.
Test Your Knowledge
Ready to see how much you've learned? Take this quick 4-question quiz to complete the lesson.
Take the Quiz to Finish
Complete the quiz above to unlock the lesson completion.